FAQ: Email Print
- Q1: How do I add another printer to my Epson Connect account?
A: Please follow these steps:
1. Install the product's software using the CD that came with it.
2. Do one of the following:
- If you see the window below, click Next.

- If you see the window below, make sure the box next to Epson Connect Email Print is checked, then click Next.

3. Select the printer you're setting up, then click Next.

4. Select Printer Registration, then click Next.
5. Read the License agreement and privacy statement, click Agree if you agree, then click Next.
6. Click OK when you see the window below.
7. Click Sign In.
6. Enter your Username and Password, then click Sign In.
When you see the printer's email address window, the printer is now registered to your Epson Connect Email Print account.
- Q2: How do I enable Epson Connect for my printer (Windows)?
A:
Install and run the Epson Connect Setup tool. Allow access to Epson Connect through your firewall, if you use any.

Select the printer which you want to connect to Epson Connect.

Select “Printer Registration”

Agree to the license agreement

Click OK to print the registration sheet

Printer registration in progress

The confirmation sheet is printed out. It contains your printer’s unique email address and a QR code is provided for you to easily copy the email address.

Now you have to either register for a new account, or sign in with an existing account.


Setup is done.

To manage your printers, you can log in to
www.epsonconnect.com using the User ID and password created earlier on.

Printer is added to the list.

- Q3: How do I enable Epson Connect for my printer (Mac)?
A:
Download and install the Epson Connect Setup tool.

Run the Epson Connect Setup Tool.

Select the printer which you want to connect to Epson Connect.

To register the printer, choose "Printer Registration".

Agree to the license agreement.

Click "Ok" to confirm the printer registration.

Printer registration in progress.

Upon successful registration, a confirmation email is sent to you and a sheet is printed out. It contains your printer’s unique email address and a QR code is provided for you to easily copy the email address on mobile devices.


You can choose either register for a new account, or sign in with an existing account to add the printer.


Printer is successfully setup. Now you can print to the printer using email address.
To manage your printers, you can log in to www.epsonconnect.com using the User ID and password created earlier on

- Q4: How do I check whether my printer is connected to Epson Connect?
A: Ensure your printer is ready to print and error free.
If you have registered with Epson Connect, sign in to your account and check your printer's status on the Printer List.
- Q5: How do I delete my Epson Connect account?
A: Follow these steps:
1st : Delete all registered printers with the Printer Setup tool. You need to delete all printers before you can cancel the account.
2nd : Sign in to your Epson Connect user account. Select Account Information in the upper right, and then click Delete User Account.
When you delete a User Account, the setting information i.e. Email address, Approved Senders List and Email notification settings of the printer are deleted too.
- Q6: I forgot my password. What should I do?
A: Click on the Forgot Password link on the sign-in page. A temporary password will be generated and sent to your email address.
- Q7: How do I transfer a printer from one Epson Connect account to another?
A:
In order to transfer a printer from an existing account to a new one, follow these steps:
1st : Delete the printer from the current Epson Connect account.
2nd : Reset the printer.
3rd : Register the printer with the new Epson Connect account.
- Q8: I've run the Epson Connect Installer from my CD, but I still can't use Email Print. What should I do?
A:
1. Check that you have completed the setup process by creating your Epson Connect account at www.epsonconnect.com/user.
2. Check the email sent to you from the Epson Connect server for your username and password.
- Q9: Registration failed with Epson Connect. What should I do?
A: When connecting to the internet, it might be necessary to set the DNS/Proxy server depending on network environment.
In the DNS/ proxy setting window of Epson Connect Printer Setup, click Acquire Settings from the Computer.
If this doesn't work, please contact your network administrator.
- Q10: What do I need to do when I transfer or dispose of my printer?
A: You should delete the printer from your Epson Connect account to ensure that your email address is no longer associated with it. This way, any confidential or personal information will not be accidentally sent to a printer which you no longer own.
- Q11: What should I do if Epson Connect suddenly stops working?
A: Please try the following:
Ensure your printer is ready to print and error-free.
Check that your printer is properly connected to your wired or wireless network.
Make sure that your internet service is functioning correctly.
If the Approved Senders List is enabled, try sending an email from an approved email address.
If the service is still unavailable, please contact Epson Support.
- Q12: Can I disable notification emails?
A: Yes, please follow these steps to disable notifications emails:
To disable notification emails to yourself:
1. Sign in to your Epson Connect Email Print account.
2. Select your Notification Email Settings page.
3. Uncheck the email notifications settings you want to disable.
To disable notification emails to those sending you emails and attachments for printing:
1. Sign in to your Epson Connect Email Print account.
2. Select your Approved Senders List page.
If you have "Do not use the Approved Senders List" selected simply uncheck "Send Print Status Notification Email to Sender".
If you have "Use Approved Senders List" selected, you can uncheck "Send notification email for each individual sender".
- Q13: Can I only print the attachments and not the sender information and email body?
A: Yes, you can choose to only print the email attachment. Sign in to your EPSON Email Print account and select Print Settings to configure this option.
Note: By default, sender information and the email body text are printed.
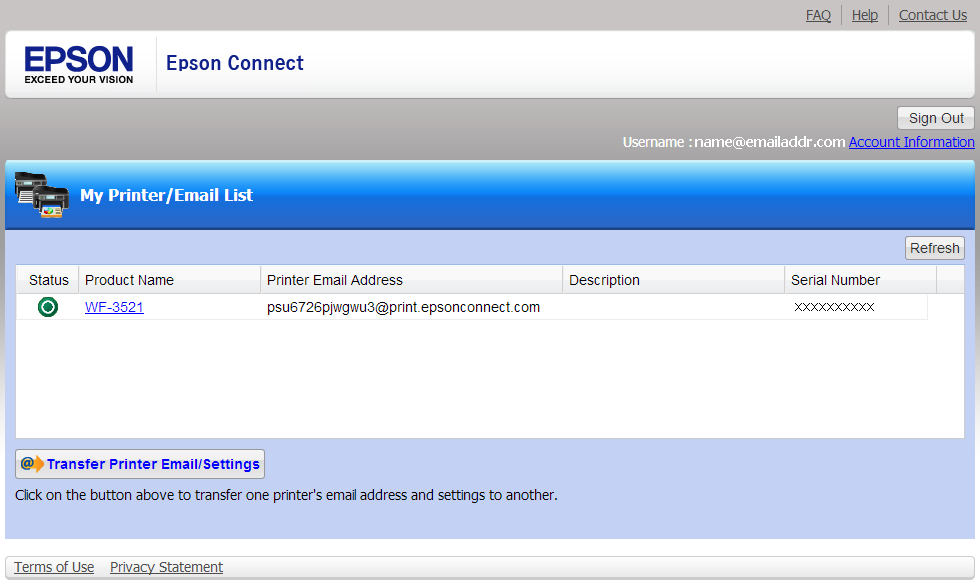
- Q14: Can I transfer an email address from one printer to another?
A:Yes. To transfer a printer's email address, please follow these steps
1st : Register the new printer with your Epson Connect account.
2nd : Sign in to Epson Connect.
3rd : Click Transfer Printer's Email Address.
4th : Select the destination printer you want transfer the email address to and the printer you want to transfer the email address from.
5th : Transfer the printer email address.
6th : Restart your printer.
The new email address will not take effect until you restart the printer. This process also allows you to transfer a printer's Approved Senders list and other settings.
- Q15: Can anyone send emails to my printer?
A: Yes, the default setting allows anyone who knows your printer's email address to send emails and attachments for printing. To limit who can print to your printer, please enable the Approved Senders List. You can add or remove sender email addresses and domains from the Approved Senders List at any time.
- Q16: How do I cancel a print job?
A: The print job can be cancelled using the printer's control panel or the owner can log on to the Epson Connect website and cancel the Pending or Stopped emails on the Print Log page.
- Q17: How do I change my username/email address and password?
A: To change your username / email address and password:
1. Sign in to your Epson Connect account
2. Select Account Settings in the upper left of your screen.
3. Click "Change Email Address" or "Change Password" and update with a new one.
- Q18: How do I find my printer's email address?
A: You can find your printer's email address by:
Printing the network confirmation page using your printer's control panel.
Signing in to your Epson Connect Email Print account.
- Q19: How do I temporarily suspend my Email Print service?
A: Sign in to your Epson Connect account and select Suspend/Remove Service page. Click Suspend or Resume.
Note: While your Epson Connect Email Print Service is suspended, any new print jobs will not be accepted or saved to the server.
- Q20: How many pending print jobs or emails can I have in Epson Connect?
A: A maximum of 100 emails can be saved with a pending status. If 100 emails are already pending, no more emails will be saved. All pending emails will be removed from the queue after 3 days.
- Q21: My printer stopped printing in the middle of printing, what should I do?
A: There are several possible causes for an interrupted print job.
Please check on the following:
- Check for any Epson Connect Email Print Service status updates sent to your email account.
- Make sure your internet connection for the printer is working (you can use a computer to see if you have internet access)
- Make sure the printer is on and error free
- Check if the printer has a strong signal to your wireless router
Note: Try moving your printer to a different location within range of your wireless network. Avoid placing the printer near a microwave oven, 2.4 GHz cordless phone, or large metal object such as a filing cabinet.
- Q22: What is the difference between Email Print and Remote Print?
A:Email Print allows printing of photos and documents from anywhere simply by sending an email to the printer's email address using any device which is able to send an email. You can set the printer to print the email with the attachments or only the attachments.
Remote Print allows you to print over the Internet right to your printer. The Remote Print printer driver will connect your PC (Windows only) or mobile device (iOS or Android devices with iPrint4) using your printer's unique email address.
How to print using Remote Print
From PC:
Open your document, select File --> Print, next select the Remote Print driver from the list. You can also make printer settings using the remote printer driver.
From Mobile Device:
1. Add the printer to iPrint (installed on your mobile device) using "Remote" and entering the printer's email address.
2. Select this printer.
3. Print the photo or document using iPrint to this printer.
Note: For a list of supported printers, please refer to our Epson Connect Compatibility table
- Q23: What is the maximum number of attachments I can attach to an email?
A: You can print up to 10 attachments with a total email size of 20 MB.
- Q24: Which email applications are supported by Epson Connect?
A: The following applications are supported:
AOL Mail
Apple Mail 2.0 or above (iPhone, iPad, MacBook, MacbookPro)
Blackberry Mail Client
Gmail
Hotmail
Microsoft Outlook 2003, 2007, 2010
Microsoft Outlook Express
Nokia/Symbian Client
Yahoo! Mail
Epson Connect may accept emails from other applications, however results may vary.
- Q25: Why are only image files printing and not document files?
A: You have Photo Paper Mode enabled. Please sign on to your Epson Connect Email Print account and check the Print Settings page to turn off Photo Paper Mode.
If your printer is in Photo Paper Mode, it can only print the following file types: JPEG /TIFF/BMP/GIF/PNG
- Q26: Why didn't I get a notification email?
A: There are several reasons why you may not have received an email.
-The notification email may be in your junk mail folder. Check your email filter settings.
-Email Notifications may be disabled. Sign in to your Epson Connect Email Print account and check your Email Notification Settings page.
-Your email address registered with Epson Connect Email Print is incorrect. Sign in to your Epson Connect Email Print account and check your Account Information page.
- Q27: Why does the printed file look different from the original?
A: There are many factors that can affect document formatting. For best formatting results, convert the file to PDF before sending.
Note: In Excel, only the active worksheet will print, however any information outside of the Print Area may not print.
- Q28: What does XMPP Status mean on the network status sheet?
A: None: XMPP Status may have stopped due to an HTTPS connection error. Please check the HTTPS Status
DNS Server Not Found: Failed to access to the DNS server. Please check your Internet connection is working correctly and DNS server settings of your printer are correct
Domain Name Not Resolved: Failed to resolve the DNS domain name. Please contact your network administrator for assistance.
Proxy Server Not Found: Cannot access the proxy server. Please check the proxy server settings.
Rejected by Proxy Server: Failed to connect to the proxy server. Please confirm whether an XMPP (5222) port is open
XMPP Server Not Found: Your internet connection or Epson Connect is temporarily unavailable.
Server Error: Epson Connect is currently unavailable.
- Q29: What does the HTTPS Status mean on the network status?
A: None: HTTP Status may have stopped due to an XMPP connection error. Please check the XMPP Status
DNS Server Not Found: Failed to access to the DNS server. Please check your Internet connection is working correctly and DNS server settings of your printer are correct
Domain Name Not Resolved: Failed to resolve the DNS domain name. Please contact your network administrator for assistance.
Proxy Server Not Found: Cannot access the proxy server. Please check the proxy server settings.
Rejected by Proxy Server: Failed to connect to the proxy server. Please confirm whether an HTTPS (443) port is open
HTTPS Server Not Found: Your internet connection or Epson Connect is temporarily unavailable.
Server Error: Epson Connect is currently unavailable.
